Tuesday, January 21, 2014

Blender - 3D Imaging and Animation Software

Source: Google Images

Introduction

"Blender is a  free and open-source 3D computer graphics software product used for creating animated films, visual effects, art, 3D printed models, interactive 3D applications and video games" (Wikipedia).

I recently stumbled across Blender looking for an alternative to the popular Autodesk 3d modeling software that ranges in the hundreds of dollars. Being a strong advocate of free and open-source anything, I was excited to give it a try. Not knowing what I was about dive into, I made my way over to the Main Website grabbed myself a copy and opened it up. Let's just say, it was a little overwhelming at first glance, and my normal method of just poking and prodding only confused me further. So that's when I went in search for help.

The search begins for Tutorials and guides

So far I've come across a pretty good range of help out on the interweb. I started with the help of Jacob Lewis' channel on Youtube (link). He starts with showing the interface and continues from there, going through some examples that I have found in a wonderfully helpful Wikibook called: "Blender 3D: Noob to Pro". Another resource that has help a great deal of people is Blender Cookie. Their 6 free lessons on the basics of blender by Jonathan Williamson (link) is a great place to start, and their other tutorials look to be top notch.

Modeling my first head


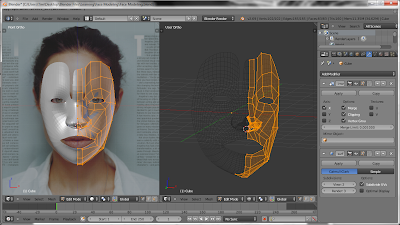
I went to my local library and picked up a some what outdated book, but still helpful, by Tony Mullen, which led me practically step by step through my first Poly-by-Poly 3d model (2007, 32-48). I didn't have the picture files used in book, but with the help of Google Images I found a good photo of Angelina Jolie to use.


After several hours of work I completed the tutorial to my liking, and here is the final result:


Using the techniques used in this tutorial I thought I'd try my hand at modeling a skull:


Recently, I've been following Andrew Price aka "Blender Guru" at his site (link), and have been learning a lot. So far I've only completed a couple and they have been some of the most inspiring for me to continue working with this software. Here are some of my finished tutorials renders:


To see what blender is capable of doing in reference to Short films and Animations. I recommend you doing a quick YouTube/Google search, and see what people have created, some are really quite amazing.

Sources

Blender Main Website. Last accessed on Jan. 4, 2014. http://www.blender.org/
Mullen, Tony. Introducing Character Animation with Blender (Wiley Publishing, 2007), 32-48.
Wikipedia. "Blender (software)". Accessed on Jan. 4, 2014. http://en.wikipedia.org/wiki/Blender_(software)

Thursday, November 14, 2013

(DIY) - Making your own Bamboo Knitting Needles

Source: Google Images

This DIY project idea came to me when I went out pricing new double pointed knitting needles at the stores and online, and to my amazement some top of the line bamboo and metal sets were in the $100 dollar range. I thought to myself, there is no way I'm going to spend that amount of money when I could totally make them for way cheaper if not for free.

The first question was, what type of materials could I use?
Bamboo skewers for BBQing
Bamboo Chopsticks from a Chinese Restaurant
Wooden dowels from a Hardware store
Metal wire found while out on a hike or bought at a store

Next, I needed to figure out how thick of a diameter each needle had to be. Since there is a wide range of sizes, I did a quick google search to give me a chart (here) to see the sizes in millimeters (mm). It would be easier to just buy a gauge if you don't already have one on hand, but my quest for this project was making these things from scratch and tools I had around the house, or could find as someone else's trash. With the chart I could now use my tape measure that has centimeters on it to get a very rough measurement that corresponds with the millimeter size. If you don't have a tape measure/ruler with centimeters you'll have to convert your inches into centimeters and go from there.

While searching around the house for materials I stumbled across some bamboo skewers. They were about 3mm in diameter, which is equivalent to a US size 2. They also already had a point on one end, which could be used for regular knitting straight from the package if absolutely needed, but by making a point on the other end it becomes a double pointed needle, that I find more versatile (mainly for socks). So really my quest for a suitable DIY knitting needle could have been over without much adventure at all, but of course there are a lot more sizes of needles to make out there, so why not try to make a whole set if possible.


So next I thought I'd try the same technique with some Bamboo Chopsticks, this also gave me a great reason to go eat some Chinese food with my girlfriend. They have a thicker diameter (close to a US size 6), so they will likely be more durable than the skewers, and plus it helps minimize what would otherwise be trash into a useful tool, for those that like to think 'green'.


Tools used:

Bamboo Chopsticks
Pocket Knife/Flint tool
Cement - To get the rough shape for the ends
Nail file - To fine tune the shape of the ends

When you have everything whittled/grinded to your liking, test them out with some old yarn first, if the tend to snag you may want use some sandpaper/nail file to smooth the needles out. It is also recommend to put on a finishing of some sort, I seen a Youtube video that rubbed wax paper to achieve this. Tell me what worked best for you. ^_^

Finished product in use:

I have also collected some metal wiring, while out on walks, that I would like to experiment with in the future, so stay tuned...

Saturday, October 19, 2013

(Knitting) Basic Footie Sock


As the Archaeological field season has begun to narrow with the winter months fastly approaching, I've been filling some of my time honing my knitting skills. These are my second attempt at making socks, my first attempt (here) turned out a little small for my feet, and the original pattern of these where way too big for my size 9 foot. However, I didn't give up, I actually modified the original pattern in a way that allowed me to use the materials I already had on hand, instead of going out and buying more. Below I have provided a link to the original pattern (which is free) if you want to follow those instructions, or I have also provided my modified pattern that I wrote out for you and my future use.

Skill Level: Intermediate
Needles used: 5 double pointed needles size: 3 or 4
Yarn type: 

Start Sock
CO 48, divide among 4 double pointed needles (12 st each). Join, [don't twist]. K1, place marker, P1, repeat <K1,P1>, till ribbing measures 3/4". K1 one rnd.


Shape Heel
Rnd 1: (RS) Sl1, K23, turn, leave remaining 24 st on other two needles unworked. Drop marker.
Rnd 2: (WS) Sl1, P23, turn, Rep last 2 rows 10 times.

Turn Heel
Rnd 1: Sl1, K14, K2tog, K1, turn - 23 st
Rnd 2: Sl1, P7, P2tog, P1 turn - 22 st
Rnd 3: Sl1, K8, K2tog, K1, turn - 21 st
Rnd 4: Sl1, P9, P2tog, P1 turn - 20 st
Rnd 5: Sl1, K10, K2tog, K1, turn - 19 st
Rnd 6: Sl1, P11, P2tog, P1 turn - 18 st
Rnd 7: Sl1, K12, K2tog, K1, turn - 17 st
Rnd 8: Sl1, P13, P2tog, P1 turn - 16 st


Gusset
K across 16st of heel flap, Pickup and K10 st along left edge of heel flap, make 1, place marker. K24, place another marker, make 1, pickup and K10 st on right side. K 8 on needle with heel flap (should be halfway on heel flap<19st on each needle>).

Gusset Decrease
*K till 2st remain on left side, K2tog. K across other two needles, K2tog, K on right side to middle of heel flap. K one rnd. repeat * until 12st remain on each needle

K in the round till your sock measures 1 1/2" from your desired length.

Shape Toe
Rnd 1: Staring at heel K till 3st from end of needle one, K2tog, K1. On second needle K1, SSK, K till 3st remain on third needle, K2tog, K1. K1, SSK on fourth needle and K to end of rnd.
Rnd 2: K one rnd. repeat these two rnds until you have 24st total.

Divide onto 2 needles [12st per needle]
Cut yarn at about 18" to weave ends in using Kitchener stitch.


Keep those feet warm, and hands busy!

Wednesday, October 16, 2013

Bandimere Speedway with "Team Petersen"

Car's taking off from the starting line at the Bandimere Speedway [Oct. 13, 2013]

Car racing... Not something I would normally go watch on a typical Sunday. However, with the right company, someone to root for, and some explanation of how things work. I definitely have a new insight into racing.

"Team Petersen" consisting of Jeff and Justyn Petersen, who have pieced together a Ford Mustang at home, and took it to Bandimere Speedway on October 13th. Weeks earlier they won a trophy, and have also been attending car shows. Below are some pictures of the day.

Other dragster car's and bikes amazed the heck out of me at how fast they can run a quarter mile. Around 7 seconds at about 170 mph was one of the faster dragster's I personally witnessed, and I feel as though they could have gone much faster, as none deployed their parachutes. This was also the last race of the year at Bandimere, and surprisingly the stands where practically empty (see below), however I'm sure it's an interesting experience with the loud race cars and crowd cheering to complement them.


Monday, August 19, 2013

Trip to Los Algodones, Mexico


Just on the other side of the US/Mexican border, lies a small uncommon town that many people may spark concern when they first hear about the main attraction's here. Actually, it's likely that you have visited such a thing in the last 6 months or so, and I don't think it would be a stretch to say many people dread visiting these in the States which practically every mid-sized town and up possesses. Have you figured it out yet?


Los Algodones is said to have the highest density of dentists, doctors, opticians, and pharmacies within its small four block radius. Catering mainly to US and Canadian snowbirds who need cheap yet reliable work done. Many of these doctors are US trained or have an equal education, and follow the same credentials and guidelines as anyone you've likely been to. It's said that on an average January over 33,000 people flock into town to visit, eat, shop, and return for check-ups.

Personally I was not the one visiting for dental work, this time. My girlfriend Julie had been introduced to the idea from friends of her mothers that had traveled there in the past. She did all the research into who to go to and ended up with Bernal Dental Group, who provided a guide from the border to their office 3 blocks away. Walking into the office I was impressed at the cleanliness, and other friendly patients waiting while watching The Simpsons in Spanish. Julie went to the back, and after roughly an hour returned and received a prescription for some antibiotics and pain medication. Because we didn't have a clue which pharmacy to go to, we were pointed in the right direction, and everything went smoothly. Even crossing the border with her prescription wasn't a problems since the customs workers are aware that the pharmacy is only a block away.


We will have to return again in February for the second half of the procedure, when all the tourist will be around as well. I'm excited since the weather will not be in the scorching hundreds, and all the hockers trying to sell you their trinkets will be occupied with the countless others actually interested in their wares.


Flying "United" Airlines

Hotel Pool area Overview

Pool and Hot Tub


As for hotel accommodations Julie and I stayed at the fancy Quechan Casino Resort, which was almost too nice of a place. Especially after returning from a small Mexican town, where as you are approaching customs there are several beggars and small children trying to obtain your change or sell you one last necklace. Honestly I don't know their entire life situations, but having the ability to go back to an Air Conditioned room and a fancy pool made me feel some remorse. This however didn't ruin the trip, but only supported my personal views that this monetary system we all love and obey is in need of a paradigm shift.

Sources:
Google Images/Maps

Sunday, August 4, 2013

Vertical Farming


Vertical farming is not entirely a new idea per se. Only a combination of things already in use today, such as skyscraper buildings and hydroponic growing methods. Add other modern technologies like solar panels, wind turbines, and a way of collecting rainwater for use. It could be possible to have a self sufficient farm that produces year around in rather unusual places.

Because Vertical farming focuses on building up rather than horizontally (as practiced today), the yield of produce per acre would be significantly higher. Now if the building uses grow lights, and humidifiers for a simple example. A tropical plant could be planted in the same building as a desert plant on another floor. In other words, it would be possible to control specific environments to get the best yields of a specific plant.

If Vertical Farming where to be implemented, it would greatly advance horticulture, and prepare ourselves for the future. We must remember that humans invented farming, and simple technologies like the plow have changed the world into what we have today. So maybe it's time to make some improvements to the old ways of farming, and if done correctly, help create a world of more abundance.

Short Introduction to Vertical Farming


Types of Plants that can be grown


Sources:
The Vertical Farm Project
Panacea-BOCAF - Educational Organization
Google Images
Youtube

Friday, August 2, 2013

(Knitting) Men's Socks


Pattern difficulty: Intermediate

This was my first knitting pattern to follow, and luckily with the help of the Lion Brand website, and the Video Tutorial on this pattern I was able to complete it and gain some experience working yarn in a knit.

I ran into a few snags along the way, but the major one was my needles were far too small for the stitch count, and so this first sock was too small to fit my foot. This pattern took me a few weeks to complete for just the single sock, but I'm sure the second one will go much faster as soon as I get some thicker needles or add a few stitches. Luckily, this color and yarn I wasn't crazy about, so it was great to practice with and use up. If you wish to make this pattern I have provided a few links for you below:

Original Pattern Download: 

PDF Download: 

Video tutorial: 


First few rounds

Links for reference/ How to: Lion Brand - Learn to Knit

Remember to always have fun, and challenge yourself to different obstacles.