
I was tired of carrying my tablet around as I listened to music or audio-books while walking around the house; and having two worn-out pairs of pants I thought, why not make something with the remains rather than just throwing them in the trash. So I came up with this little bag to suit my needs. Now I can run around the house with my tablet strapped to my back, and have both hands free to do whatever. I'm not sure how to explain this step by step in technical terms, but I did take some pictures as I went along that I can narrate.
Materials Used
- Sewing Needle
- Thread
- A couple of deconstructed old pants and cotton shirt. I spent a few hours ripping the seams of my pants while watching TV, so a seam ripper tools is handy as well for this project.
Seam Ripping of old T-Shirt
Measure the size you need, and add a few inches to allow for seam. This is the leg of one pair of pants.
Take a shirt and cut the same size as the pants, this will be the lining.
Cut another rectangle in the jeans and shirt that will be the length and width of your bag, This will be the Cover flap.
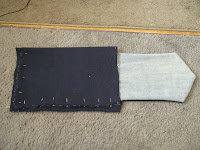
Pin them together, make sure you lay them so they are inside out so you can hide the seams. I tucked back two corners so it gives it a little shape.
This is what you should end up with after sewing and pulling inside out.
Pin the main section that we cut first
Now pin the cover flap so that it is between the jean material and shirt material of the main section. NOTE: that these pictures are wrong, and the cover flap should be facing the other way. A good thing to remember is to make sure the same material type is all facing the same way.
I wanted to add some pockets so I used pockets on my pants, and the sleeves of the shirt. Pinned them together, sewed them, and then trimmed them to the same size.
Sew them onto the main section, make sure to only sew the pockets on the top material so that it hides the stitches on the inside. However, it may add more support if you go through both materials, this is your choice in what to do.
Sew the bag together, make sure to do it inside out again to hide the seams.
The belt section of the pants I added after the fact to put a section of paracord through for a sling, and the loop at the top can allow it to be hung up or hold headphone cables while it's being worn.


This is the finished piece, in the left picture I took another belt section from some worn pants and then used the buttons on them to allow for an adjustable strap, if you want it longer just sew one under the other till you get your desired length. However, you only get one button per pant, so you need 'X' amount of pants to get a multiple adjustment strap, be innovative, there's lots of left over material on the pants.


Great project idea! You did an awesome job on it too. :)
ReplyDelete